

This article is your complete import guide. It's divided into two halves: Part A — Exporting from your old system (Classic, ComicSuite, or RMH), and Part B — Importing into your new system (Ordo or Oryx). Jump to the combination you need.
Part A — Exporting Your Old Data
Exporting from Manage Comics Classic
Step 1 — Export Customer Data
Open Manage Comics Classic.
Go to Customers → All Customers.
Click MC 2.0 Export.
Save the file to your Desktop.
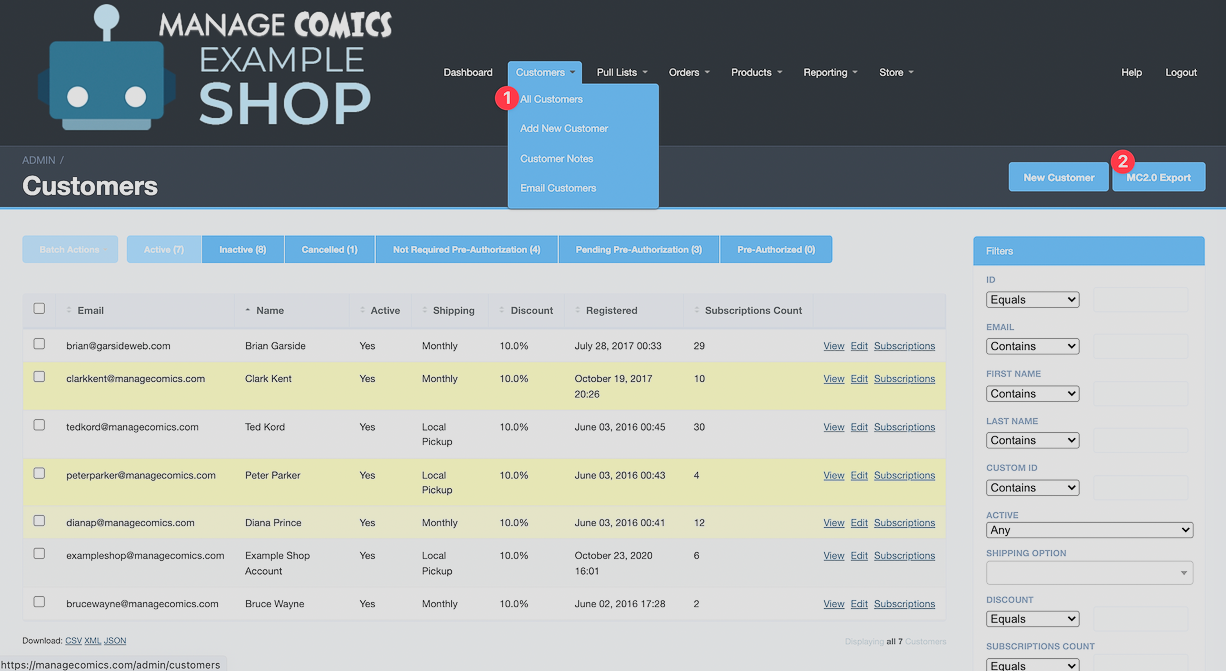
Do not edit email addresses. The email is how we match customers to subscriptions. You don't need to clean up phone numbers or check for duplicates — we handle that during the import.

Step 2 — Export Subscription Data
In Classic, go to Pull Lists → Customer Pull Lists.
Click MC 2.0 Export.
Save to Desktop.
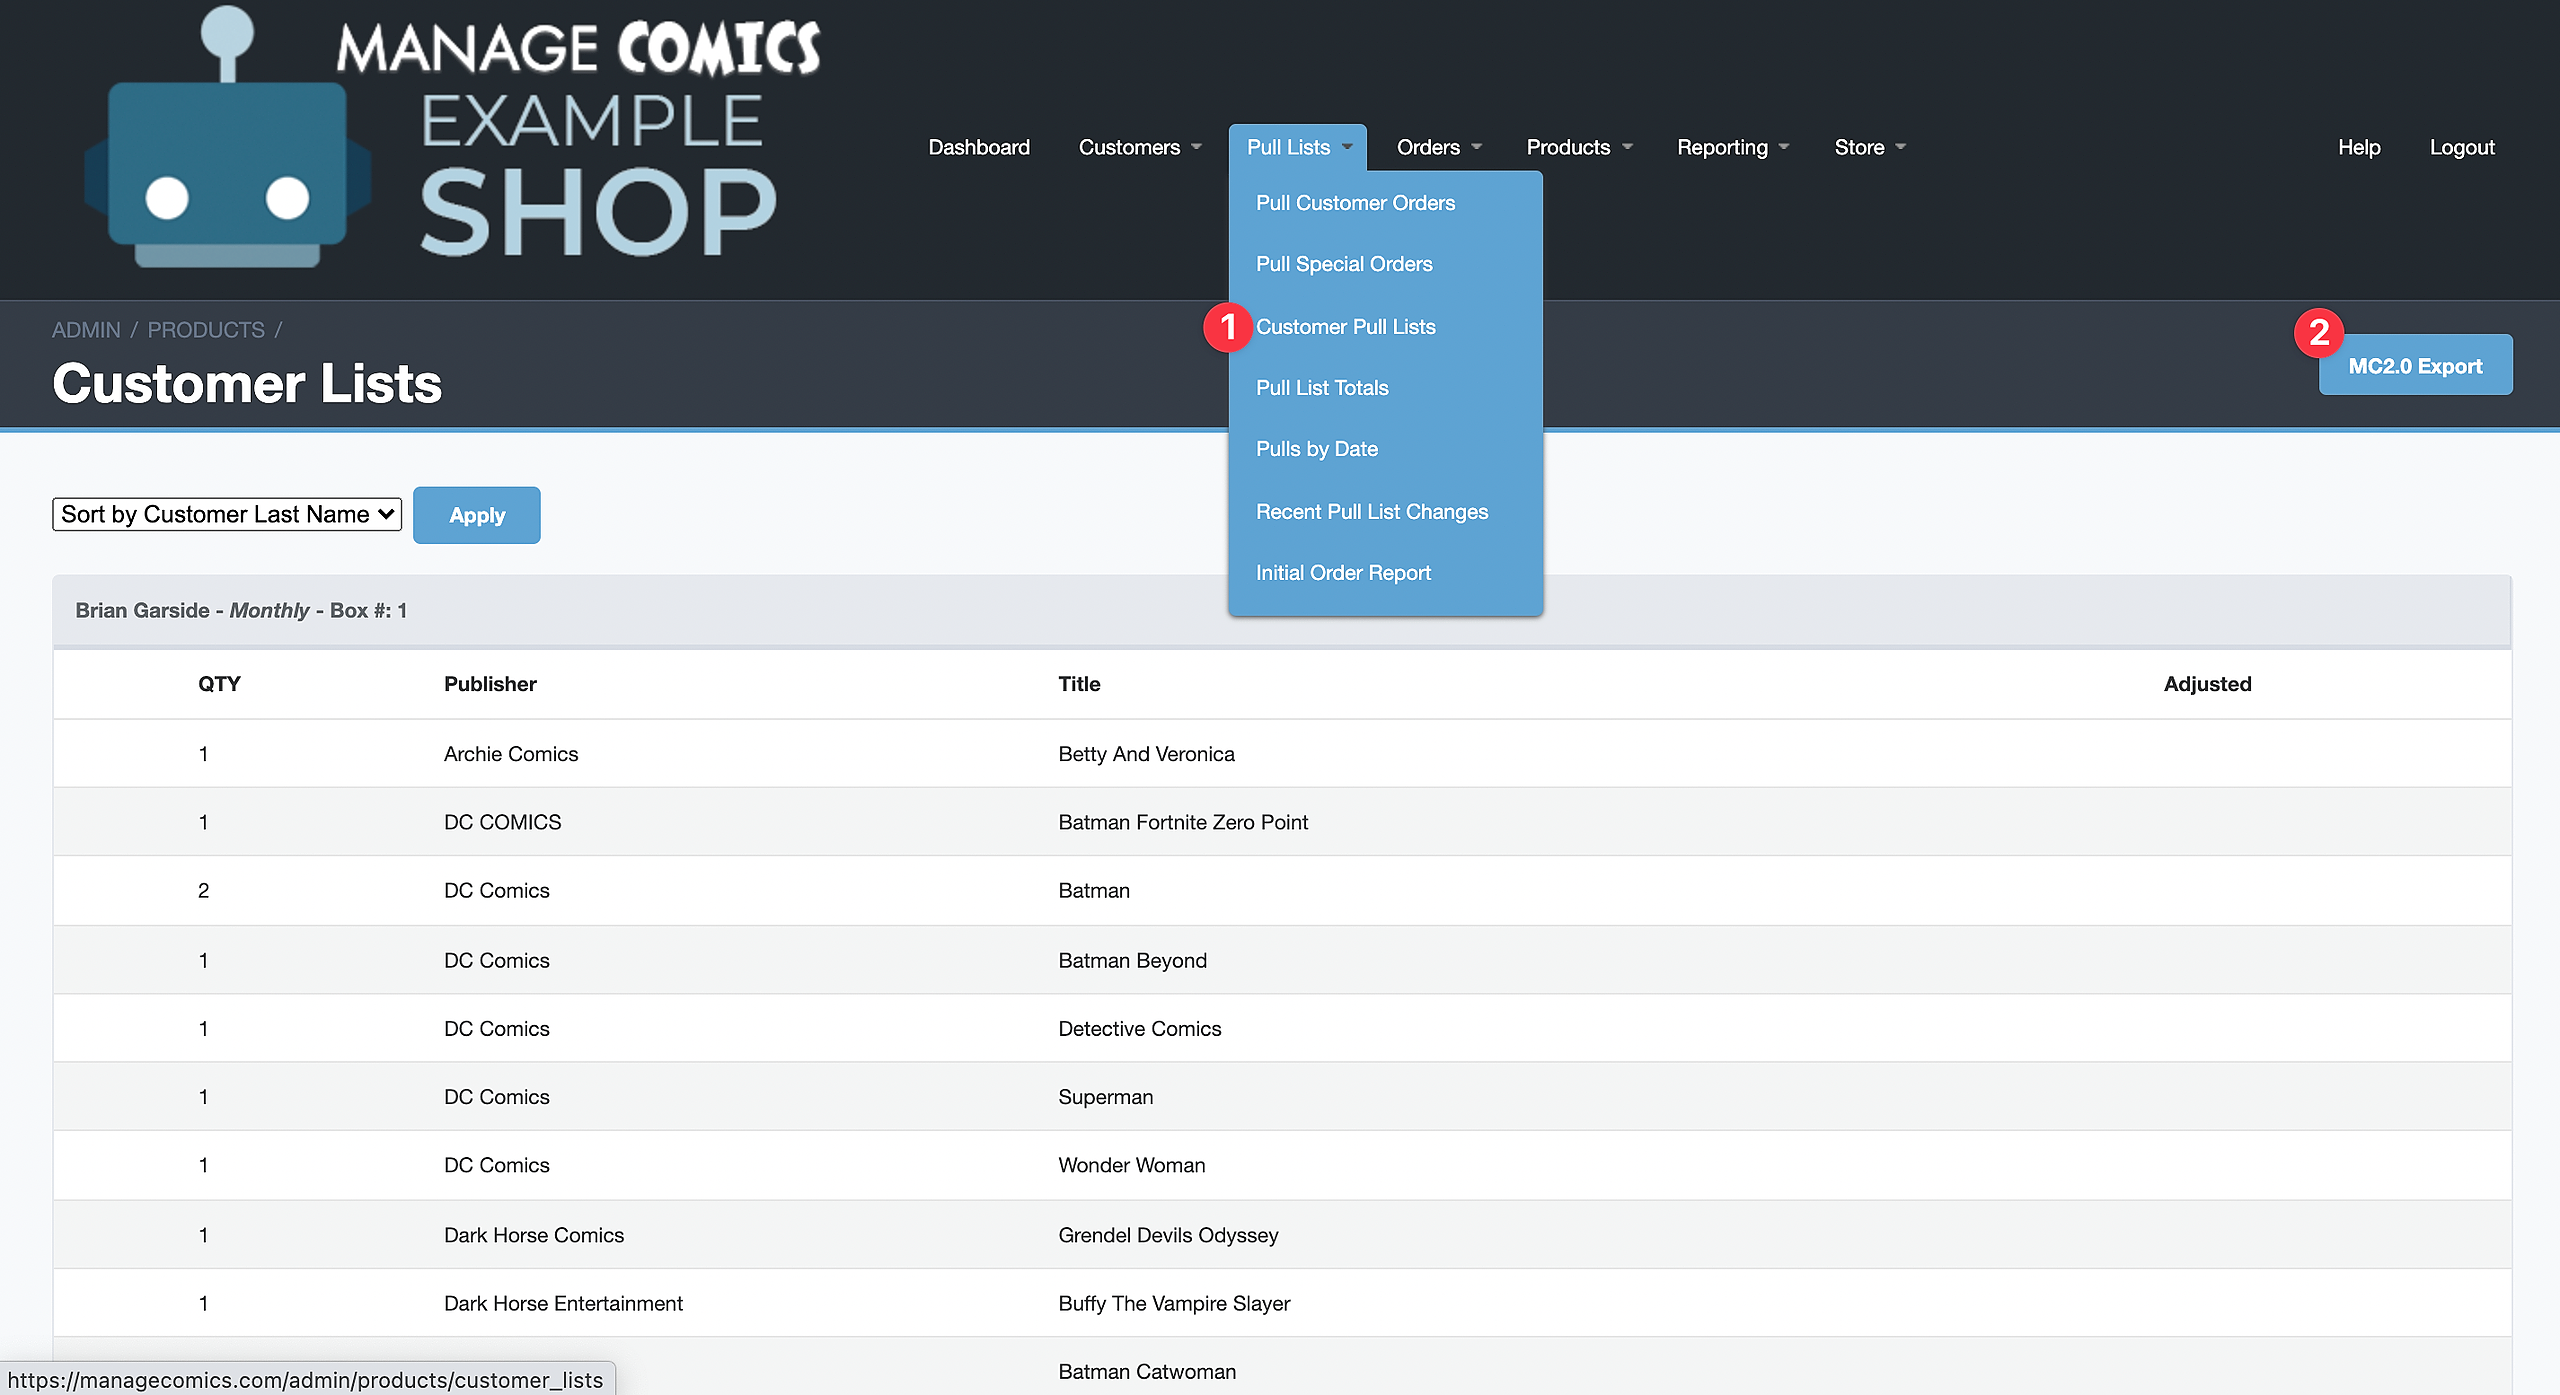
You now have two files: a customer export and a subscription export. Keep them somewhere you can find them.
Next step:
Jump to Part B: Sending us your files.
Exporting from ComicSuite
You need two files from ComicSuite: a customer list and a subscription list. There are two options for the customer export (a basic RMH export and a more complete SQL dump); the SQL dump is preferred if you have access.
Step 1a — Export Customers (basic, via RMH)
Open Store Manager in RMH.
Go to Customers → Export to Excel.
Save the file somewhere you can find it.
Step 1b — Export Customers (advanced, via SQL)
This path preserves more fields and is preferred when it's available to you.
Open SQL Explorer.
Run the following query, replacing
DATABASENAMEwith the actual name of your ComicSuite database.Save the result as a CSV with headers.
Do not change any of the fields. Don't reorder them, don't add fields, don't remove fields. The import expects this exact column set.
SQL/****** Script for EXPORTING ALL CUSTOMERS RM ******/
SELECT
  [AccountNumber],
  [FirstName],
  [LastName],
  [EmailAddress],
  [PhoneNumber],
  [Address],
  [Address2],
  [Country],
  [City],
  [Zip],
  [AccountBalance],
  [CreditLimit],
  [totalsales],
  [totalvisits],
  [CurrentDiscount],
  [pricelevel],
  [taxexempt],
  [notes],
  [vouchers],
  [limitpurchase],
  [layawaycustomer]
FROM [DATABASENAME].[dbo].[Customer];
Step 2 — Export Subscription List
Open ComicSuite.
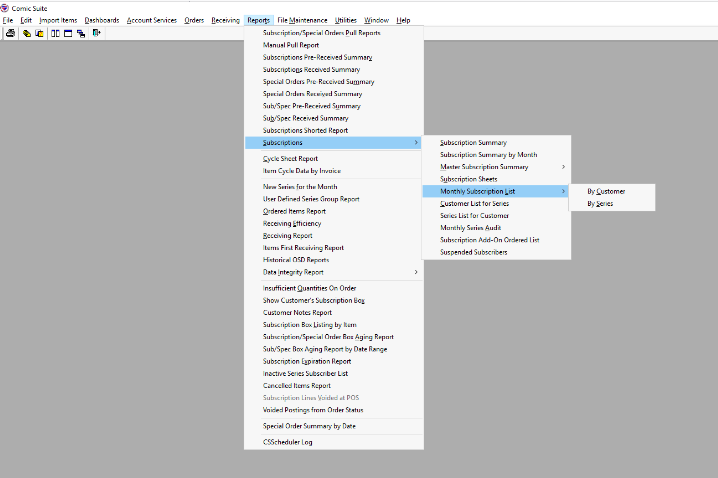
From the top menu: Reports → Subscriptions → Master Subscription Summary → By Customer.
File → Save As → CSV format.
Save to your Desktop.
Next step:
Jump to Part B: Sending us your files.
Part B — Sending Us Your Files for Cleaning
Before you import anything, send us your export files. Raw exports almost always contain things that cause import failures — duplicate emails, malformed phone numbers, encoding problems, series titles that don't match. We fix and clean the files for you so your import goes through the first time.
Email your files to help@managecomics.com and include:
Your shop name.
Your source system (Classic, ComicSuite, or RMH).
Your destination system (Ordo or Oryx).
Your customer file and your subscription file.
What we do
We review your files and fix what can be fixed: duplicate phone numbers, formatting, character encoding, and series matching.
Anything that needs a decision from you — duplicate emails, customers without an email address — we flag and confirm before finalizing.
We email your cleaned files back, ready to import.
Coming from a different system?
If you're migrating from a system other than Classic, ComicSuite, or RMH, export whatever customer and subscription data you can to CSV and send it along. We'll format it to match the import templates.
Next step:
Once your cleaned files come back, continue to Part C for your destination system.
Part C — Importing into Your New System
Importing into Ordo (Shopify)
Use the cleaned files we sent back. Customers import through Shopify's standard customer import; subscriptions import through the Manage Comics app.
Step 1 — Import Customers into Shopify
Log in to Shopify.
Go to Customers.
Click Import customers (top right).
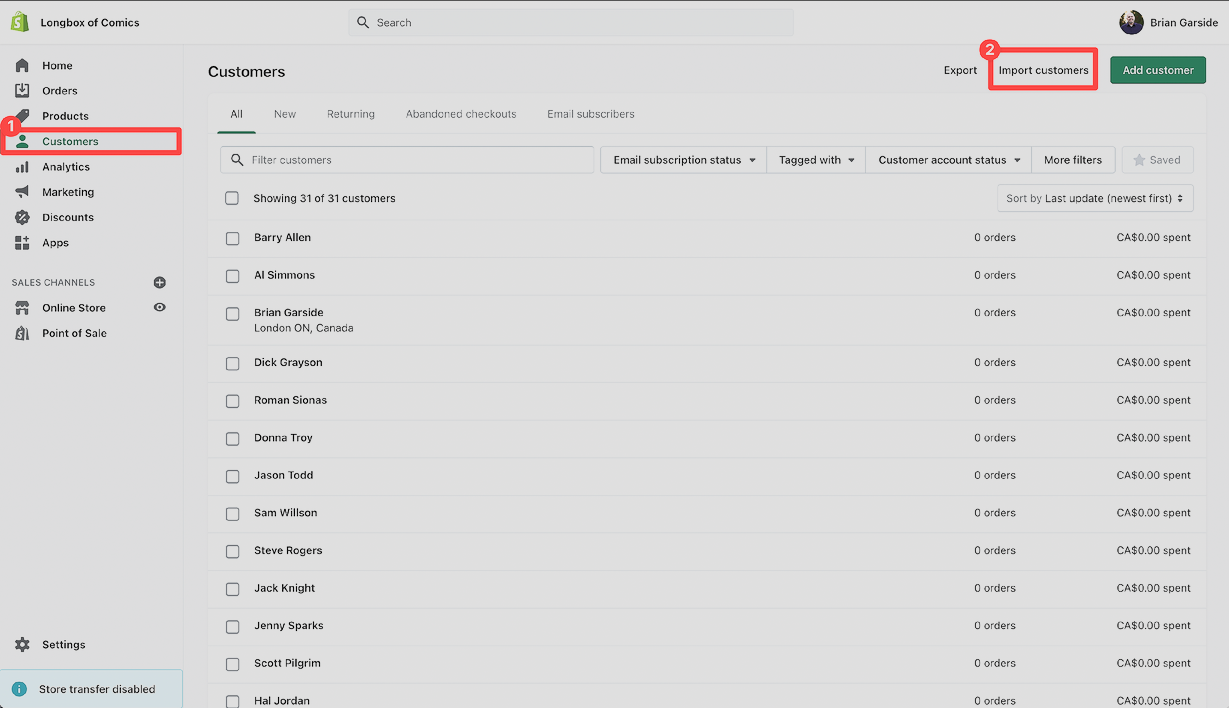
Upload your cleaned customer CSV.
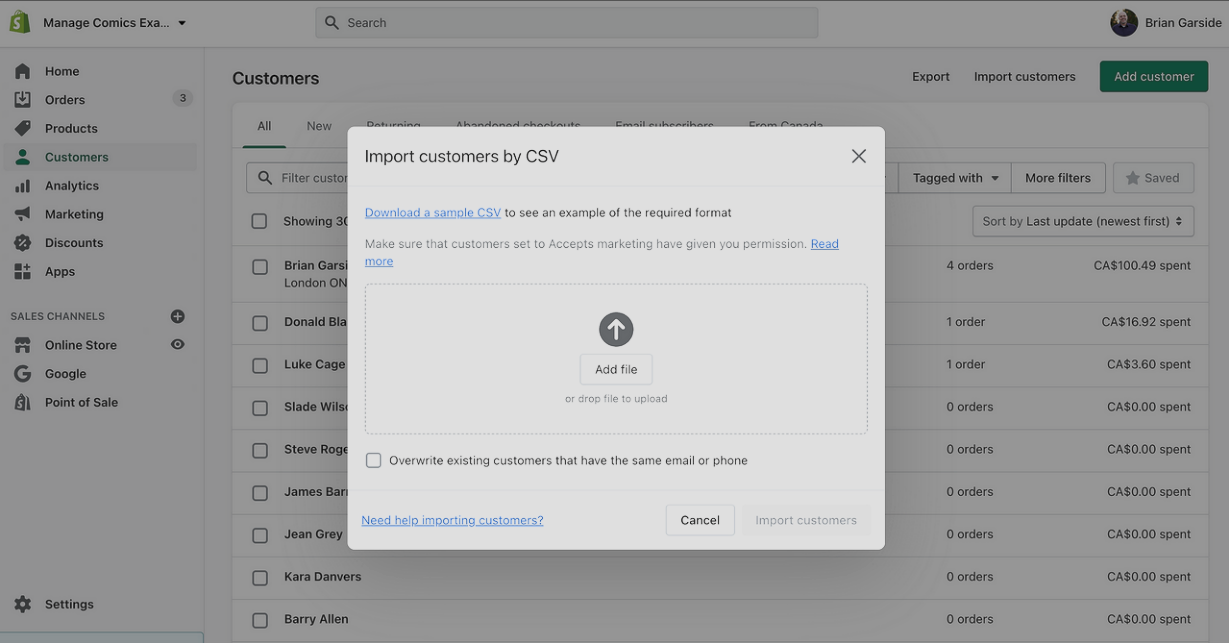
Check the box: "Overwrite existing customers that have the same email or phone." This merges your import with any customers who already exist in Shopify. If you skip this, existing customers will cause row-level failures.
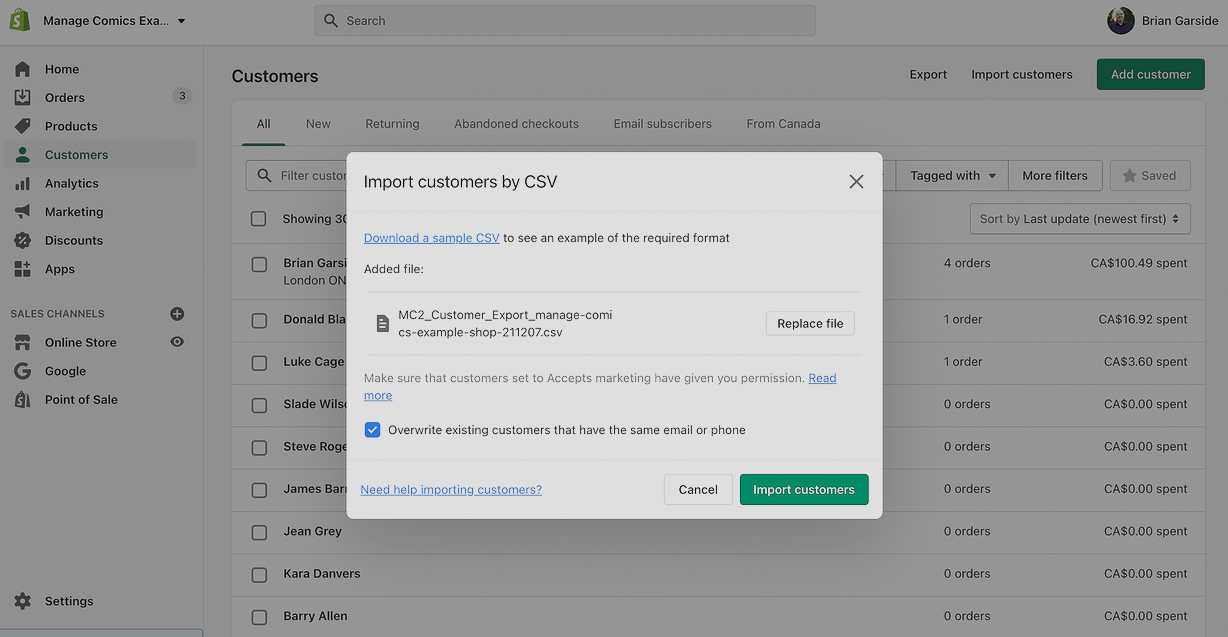
Submit the import. Shopify processes it in the background and emails you when it's done.
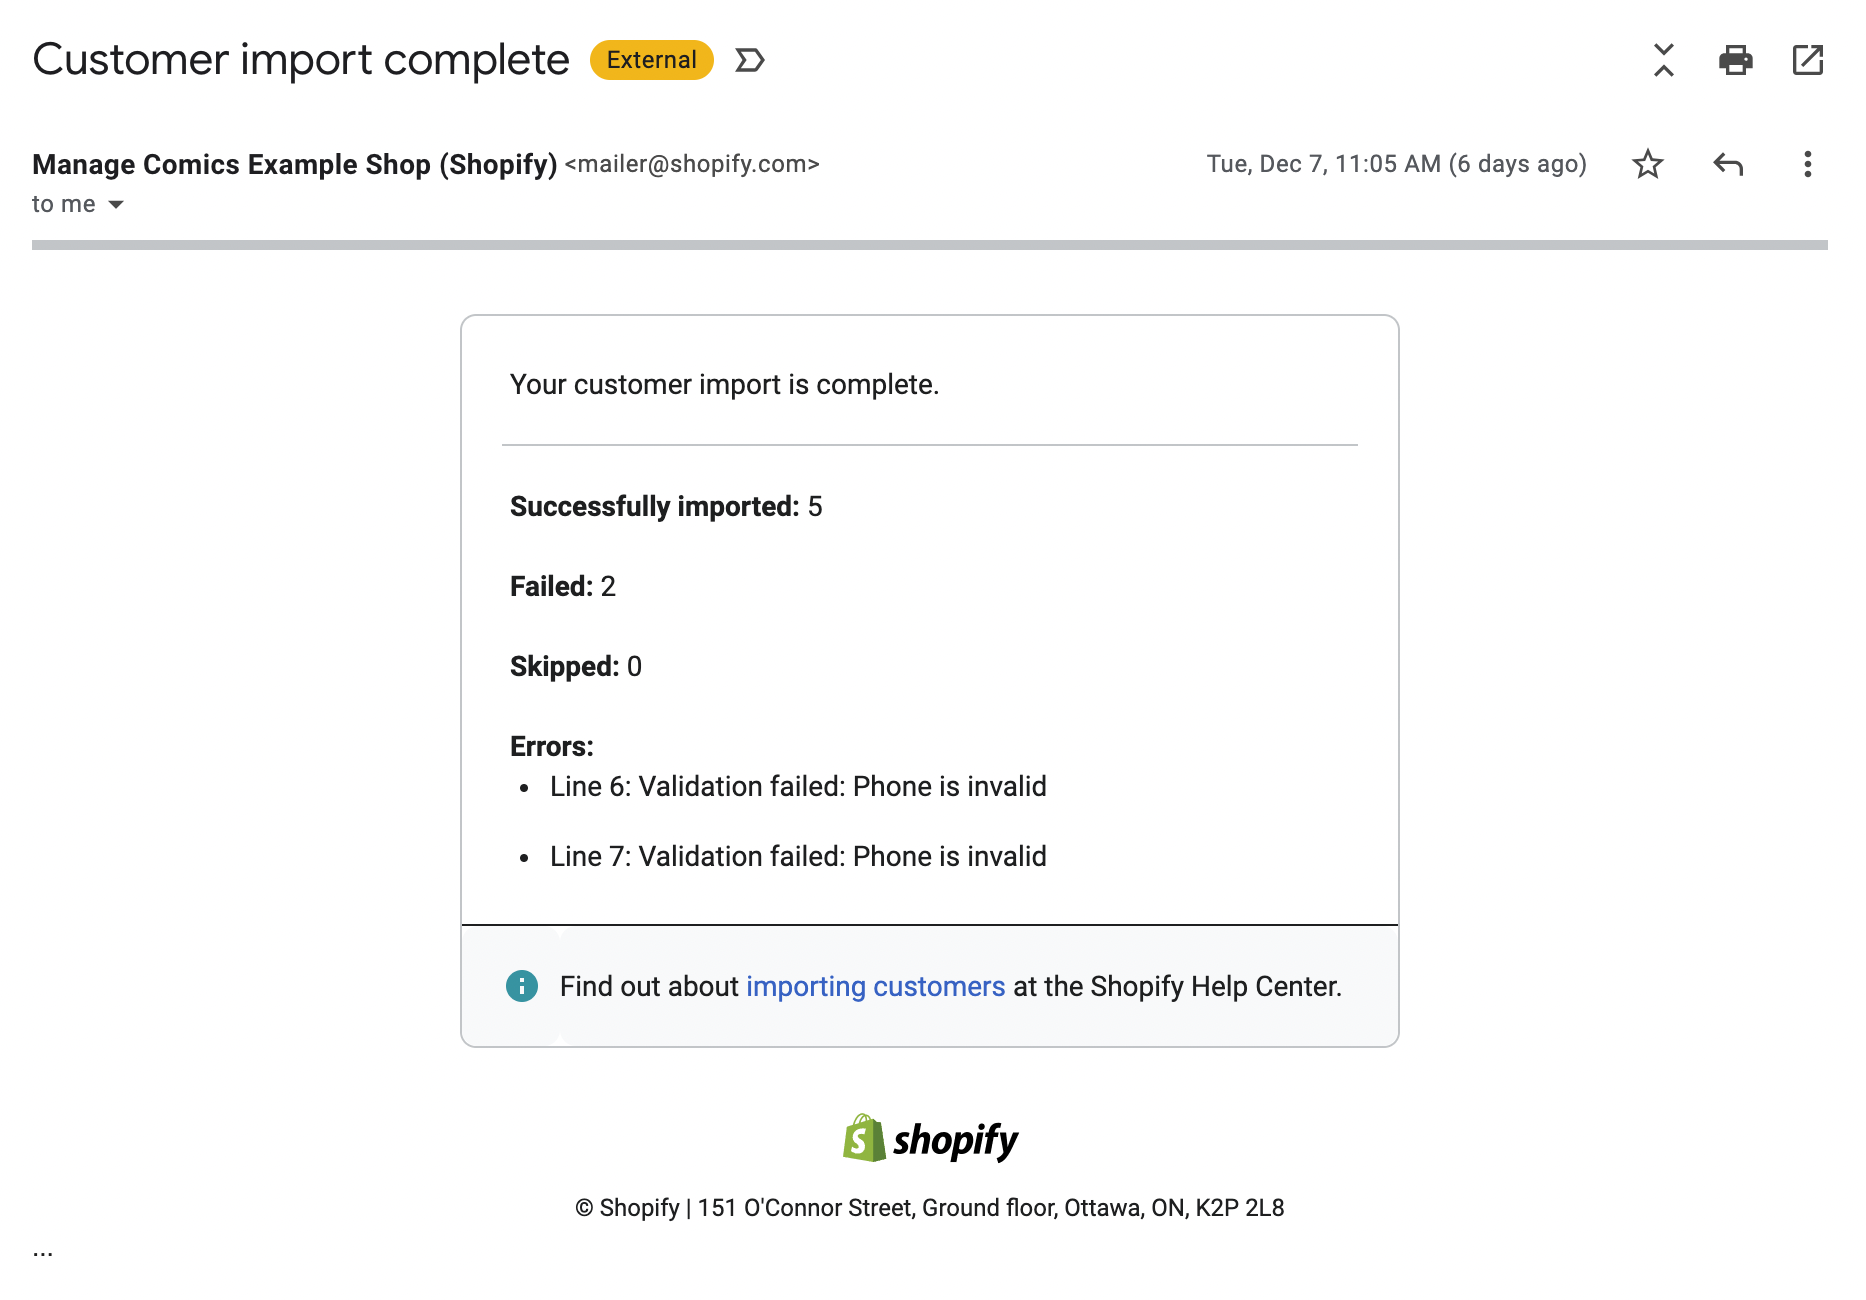
Step 2 — Review the Confirmation Email
Shopify emails you a report of what imported and what failed. Open the failures file and fix each row — most failures are phone number format or duplicate emails. Re-upload the corrected file.
Step 3 — Import Subscriptions
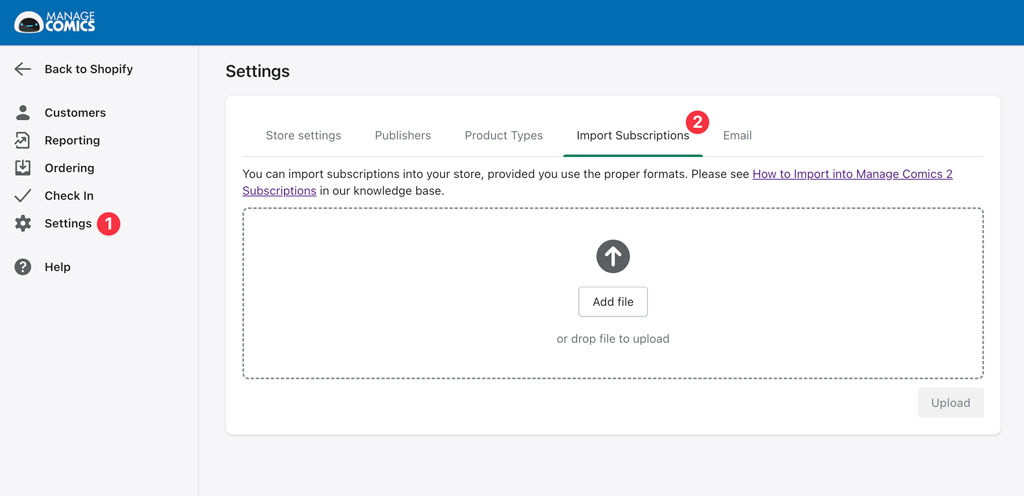
In the Shopify admin, go to Apps → Manage Comics Subscriptions → Settings.
Click Import Subscriptions.
Upload your subscriptions CSV.
Stay on the page. You'll get a success message with a downloadable results file. Download it.
Step 4 — Review the Results
Review the results file. It lists every row that succeeded and every row that failed with a reason. Fix failures in the source CSV and re-import just the fixed rows.
Then go to Customers → Customer Lists in the Manage Comics app to verify your imported subs are attached to the right customers.
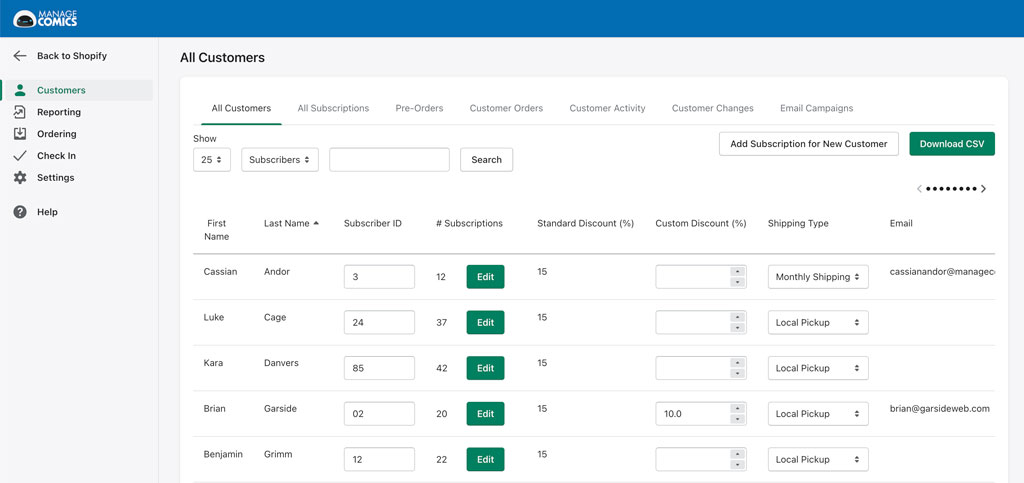
You're done! All your Classic subscriptions are now live in Ordo.
Importing Classic into Oryx
The Oryx flow is simpler because you import directly into Oryx — there's no intermediary Shopify step. This is the same whether your data came from Classic, ComicSuite, or RMH.
Step 1 — Import Customers
Open Oryx.
Go to Settings → Import Customers.
For Type, choose Manage Comics.
Drag your Customers file into the file drop zone.
Click Upload.
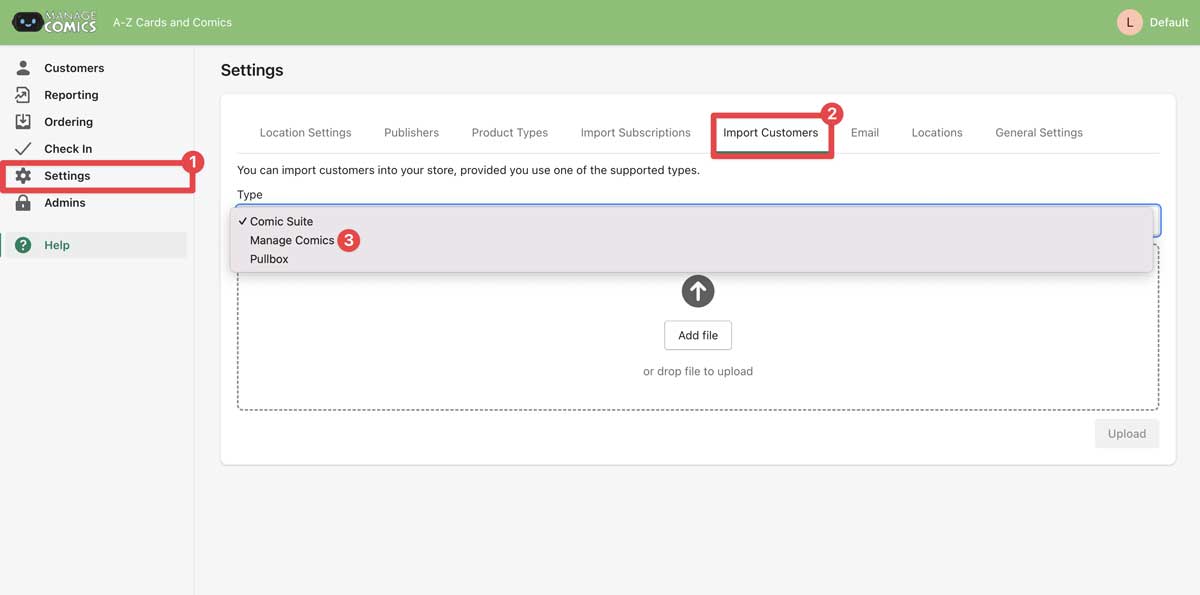
Oryx will generate a confirmation file. Download it and review for failures.
Step 2 — Import Subscriptions
Go to Settings → Import Subscriptions.
For Type, choose Manage Comics.
Drag your Subscriptions file into the drop zone.
Click Upload.
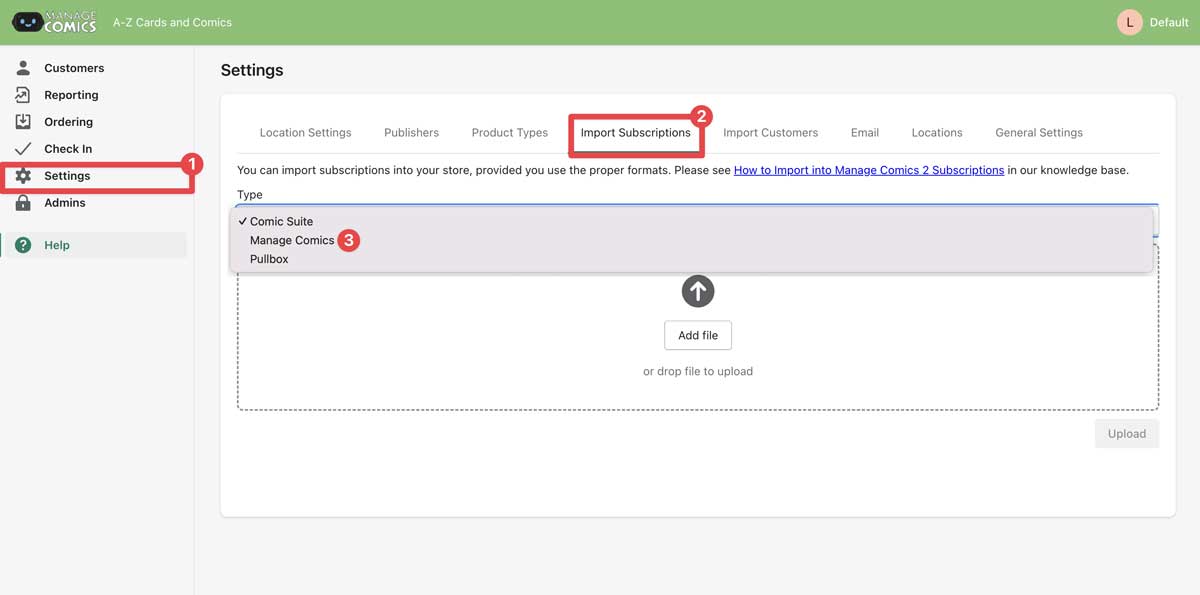
Review the confirmation file for any failures and re-upload a corrected file if needed.
Step 3 — Verify
Go to Customers → Customer Lists to confirm your customers and subs look right.
Getting Help with an Import
Import issues are some of the most common support requests we get. If you hit something that the confirmation file doesn't explain clearly, email help@managecomics.com with:
Your source system (Classic, ComicSuite, RMH).
Your destination system (Ordo or Oryx).
The confirmation file from the failed import.
If possible, the original CSV files you uploaded.
We can usually identify the cause within a business day.